The landscape of computing is constantly changing. Gone are the days of mainframes (at least in the mainstream). On-premises data centers are dwindling away because enterprises and technology companies are flocking to the cloud due to lower costs and high availability.
However, the landscape of cloud computing is constantly changing too. This is partially due to the increasing popularity of DevOps.
As DevOps practitioners, development teams must build, test, and deploy the software they write. This also means that they manage the environments their code runs in. The cloud provided virtual private servers (VPS) that could host apps.
However, server configuration is required in a space where systems admins are no longer found. This means less time for developers to write code if they’re managing servers! So configuration management tools such as Chef and Puppet emerged. When Docker became popular due to its ability to run anywhere with little configuration, cloud providers created services for hosting containers.
So what’s the new hotness in cloud computing? Serverless.
Serverless? What does that mean? How can we run code without servers?
This post will answer those questions and walk you through a simple introduction to serverless using Azure’s serverless platform with Python. But first, let’s make sure you understand what serverless is.

What Is Serverless?
A serverless architecture doesn’t really mean no server. It means less server. Your code still runs on a server, but you don’t need to care as much about the underlying infrastructure because a third-party service will handle it for you. This leads to less time in operations and more time for developing software.
Serverless typically follows a pay-per-execution model, which means you have to pay only when your code runs. This can result in huge cost savings. Serverless applications provide automatic scaling in real time based on computing needs.
For example, your app can automatically scale during peak hours and shut down the additional resources when you no longer need them. These adjustments help keep your app running while saving you money.

Let’s take a look at an example using Python with Azure’s serverless service, called Azure Functions.
What Is Azure Functions?
Azure Functions is Azure’s event-driven serverless compute platform. This type of product is also known as function as a service (FaaS). Azure Functions provide an environment to host and execute your application.
Furthermore, Azure Functions has rich integrations with other Azure services such as Cosmos DB, Event Hub, and many others.
You can trigger functions in different ways, including HTTP requests, message queues, and even on a timer. This gives you flexibility in how you develop your app.

Building Serverless Apps Using Azure Functions
This example is going to use Python and walk you through how to build a serverless app with Azure Functions. HTTP requests will trigger your code. But first, you’ll need a few prerequisites before you get started.
Prerequisites
First, you’re going to need Visual Studio Code with the Azure Functions extension. This will allow you to develop and even deploy your Function app.
To run your Function app locally, you’ll need Azure Functions Core Tools.
The third dependency you’ll need is Python. As of this writing, Azure Functions supports Python 3.7.x and 3.6.x. You can manage multiple versions of Python using virtualenv and pyenv.
Finally, you’ll need a subscription to Azure to host your serverless app. You can get started with Azure for free along with a $200 credit.
Now that you have all the needed dependencies, let’s get to the code!
Create Function Project
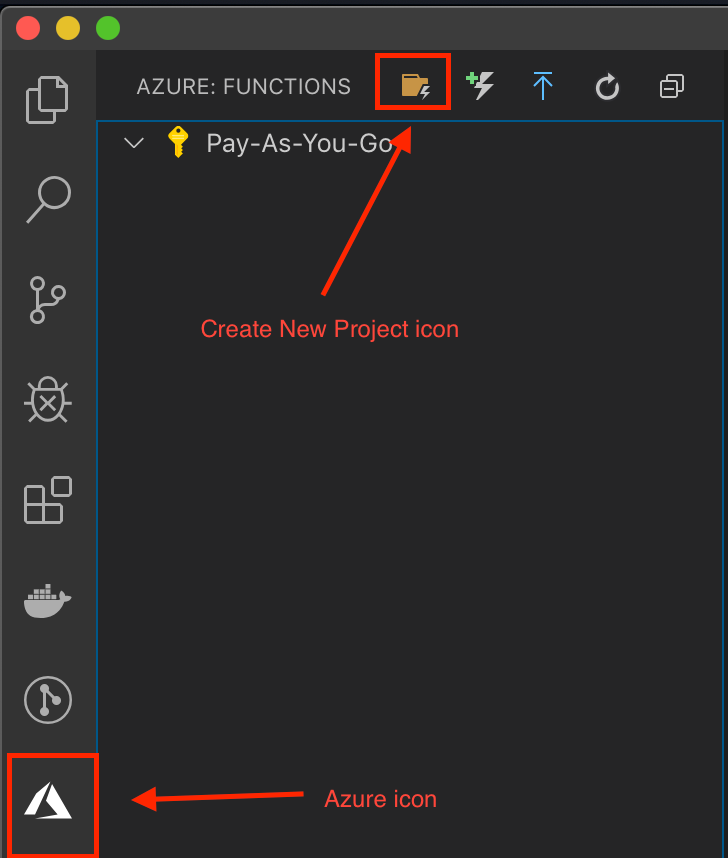
Visual Studio Code with the Azure Functions extension is going to help you scaffold your project. First, open VS Code and locate the Azure icon in the Activity Bar on the far left-hand side. You should now see the Azure Functions explorer. Click the Create New Project icon in the Functions explorer.
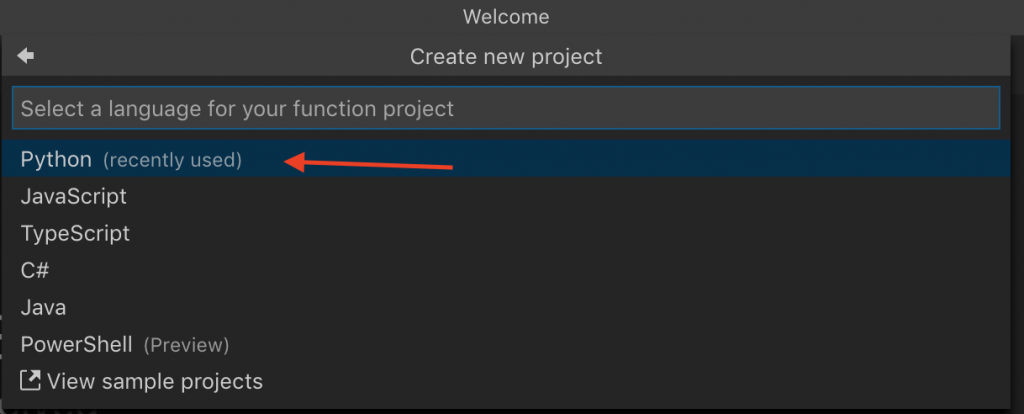
Now, VS Code will walk you through creating your Function project. It will prompt you to specify the project directory, and then it’ll ask you which programming language you’d like to use. Select Python.
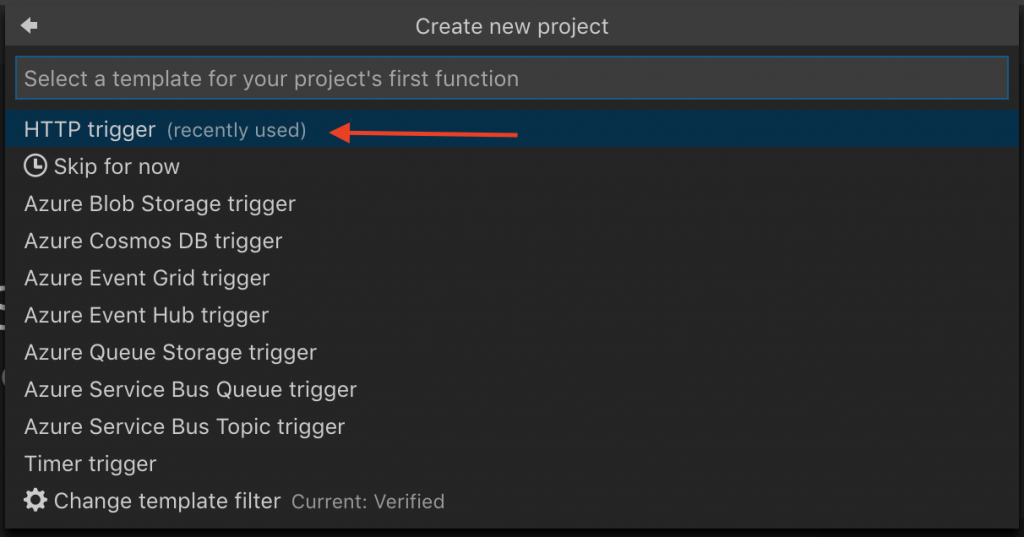
Next, VS Code will ask which template you’d like to use. Select HTTP trigger from the list of options, and provide a name for your new function.
VS Code will ask you to select the Authorization level of your function. Don’t worry too much about this now—just select Function.

Specify the location of your Python 3.6.x executable. Again, make sure you’re using a compatible version of Python! (Side note: VS Code will create a virtualenv in a folder called .venv at the root of your project.)

That’s it! You now have your first Azure Function. You should now have a project structure similar to this:
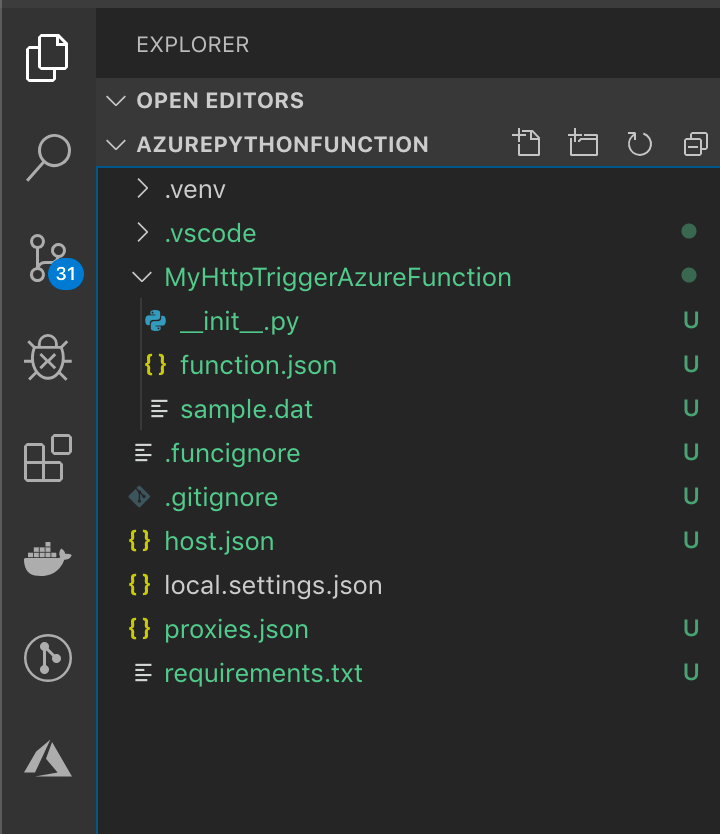
As you can see, VS Code created a lot as part of the project configuration. Let’s get familiar with what VS Code has set up for us.
The Code
VS Code generated a file in our Function project called __init__,py that should look something like this:
import logging

import azure.functions as func

def main(req: func.HttpRequest) -> func.HttpResponse:
    logging.info('Python HTTP trigger function processed a request.')

    name = req.params.get('name')
    if not name:
        try:
            req_body = req.get_json()
        except ValueError:
            pass
        else:
            name = req_body.get('name')

    if name:
        return func.HttpResponse(f"Hello {name}!")
    else:
        return func.HttpResponse(
             "Please pass a name on the query string or in the request body",
             status_code=400
        )
These 24 lines of code make up your entire Azure Function!
What’s this code doing? The req parameter in the main function provides all the details of the HTTP request, including parameters and request body. The function checks if a query parameter called name is provided in the request and responds accordingly.
You might ask what HTTP server is running under the hood. That’s just it: you don’t need to concern yourself with this detail. That’s the responsibility of the Azure Function service.
One other file I want to bring attention to is function.json. This file contains the configuration of your Function so that Azure Functions knows what to do with it. A few things the functions.json file handles are:
- The script file name (defaulted to __init__.py, so not something you generally need to worry about).
- Binding details (determines which HTTP actions to accept. You could change the function to only accept GET or POST requests, for example).
Let’s now make sure your Function app works by running it locally.

Test Locally
The Azure Function Core Tools lets you run your Function on your local machine. You can start the Function app either through VS Code or through the command line interface.
To run the Function app through VS Code, select Start Without Debugging (or Ctrl-F5) from the Debug dropdown. VS Code will execute a command in the Integrated Terminal to start the Function app, so you should see the logs of the local Function server starting up.

Now that the local Function server is running, you can use curl from the command line to send a request to your HTTP Function. The logs should indicate the URL of all HTTP Functions within your app. Copy the URL from the logs. To call the function, here’s a few ways to do this:
- Use a REST Client such as Postman or Insomnia.
- Directly call the endpoint using the command line and curl (curl http://localhost:7071/api/MyHttpTriggerAzureFunction?name=John)

This shows that your Function app is working locally!
Now let’s deploy your Function app to the cloud.
Deploy
The Azure Functions extension for VS Code gives also helps you deploy your Function app to the Azure cloud. Once again, click the Azure icon on the left-hand side. You should see a list of all the available subscriptions that are associated with your Azure account. I only have one, called Pay-As-You-Go. Click the Deploy to Function App icon.
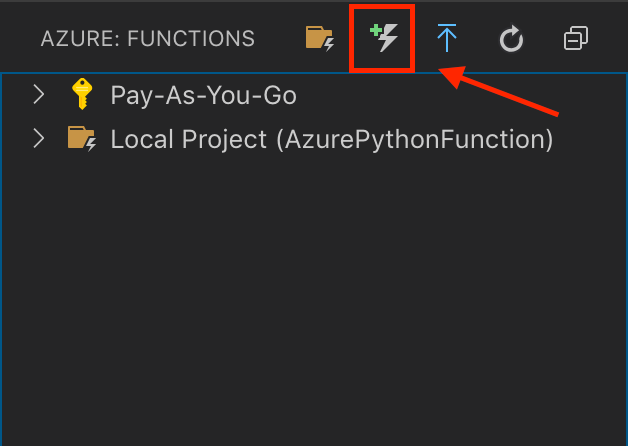
Select Create new Function App in Azure.

Enter a globally unique name for your Function app.

Select the location where your Function app will be hosted.
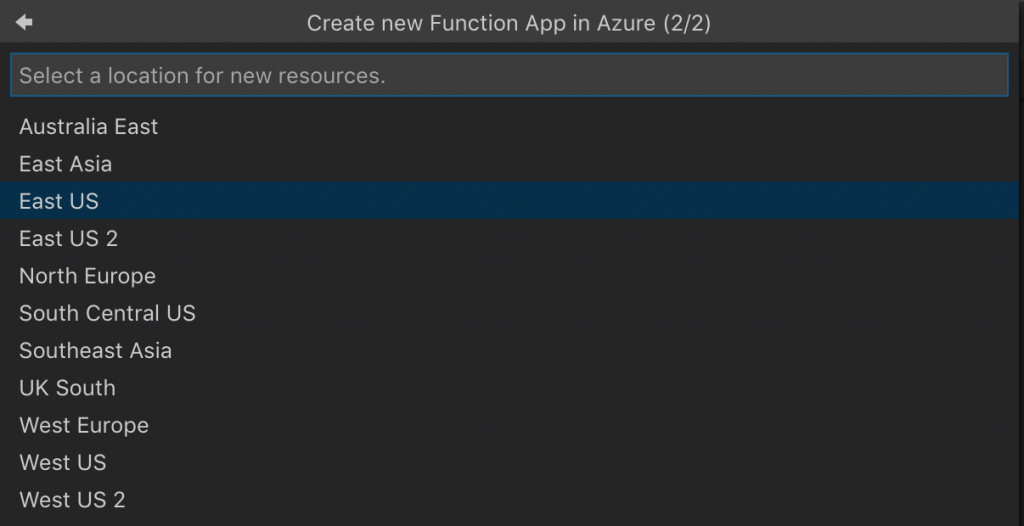
VS Code does a few things for you after selecting the location for your resource, which may take several minutes to complete.
- First, it’ll create a new Resource Group in your selected location.
- Next, it’ll create a Storage Account to save your code and assets associated with your app.
- After that, it’ll set up a new Application Insights resource.
- And finally, it’ll provision a new Function App resource.
Your Function app is now deployed to Azure! You can view all the resources VS Code created for you by logging in to the Azure Portal.

Test Deployed Function
You finally have your Function app deployed to Azure, so let’s see how you can test it to make sure it’s working.
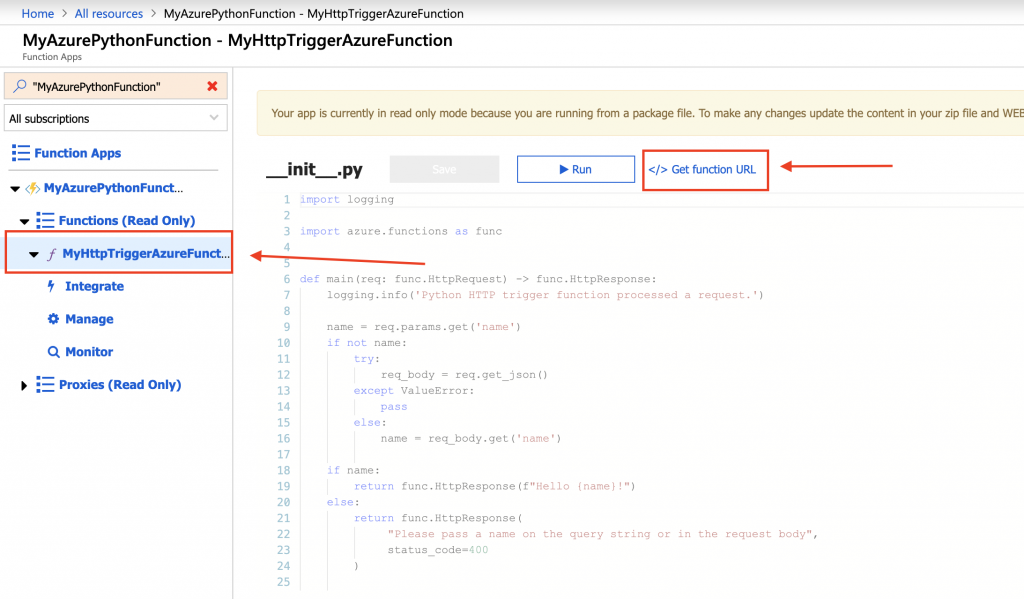
The Azure Portal provides a list of all resources that are associated with your account, including Azure Functions.
Find your newly deployed Function in the resource list and click it. This will take you to the details of your Function app, including all the associated Functions. Our example only has one Function. Click on the name of your function, followed by Get function URL.
This will open a modal containing the URL of your HTTP Function. Copy the URL. You can use this URL in the browser, curl, or Postman to make sure the Function is working the same way as it did locally.
Viewing Function Logs
With the Azure function app deployed into your Azure tenant, you’ll be able to view logs and other function events. The example code above uses the following line to log when the function is called:
logging.info('Python HTTP trigger function processed a request.')
To view logs, go to the Application Insights resource created in Azure, and click Search. Then, search for python HTTP trigger:
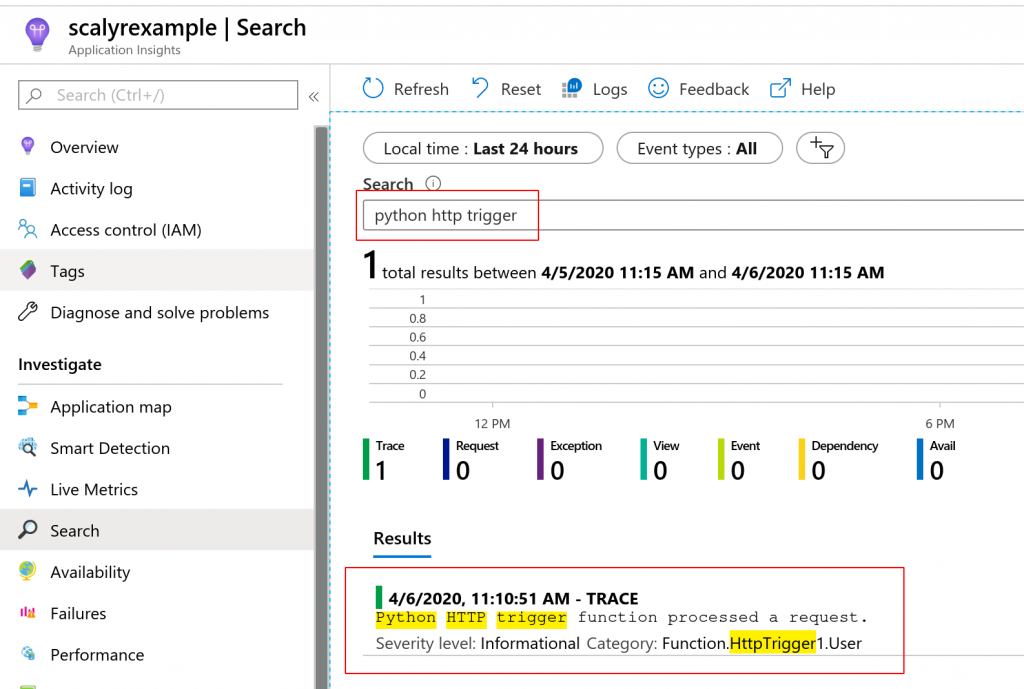
You can use this information to determine the current state of the deployed functions. As your functions start to expand, consider moving to a more established system such as Scalyr’s Log Management tool to analyze different events that may be occuring in your function apps.
Summary
We covered a lot in this post. First, you learned about some of the benefits of serverless. You then created an Azure Function app using Visual Studio Code and tested it on your local development environment. And finally, you deployed your Function to the Azure Function service in the cloud.
I encourage you to grow your knowledge with serverless by experimenting with other triggers. I hope you now have enough info to consider serverless for your next project!


